Showing posts with label T-shirt reconstruction. Show all posts

Wednesday, September 01, 2010

I'm baaaaaack!!(Well, kinda....)


These days my postings will be irregular because, I'm back at school and have been quite busy with schoolwork and friends. But I will be postings pics of anything I've done recently...
......And with that said, check out my current Pride and joy:

Can't wait to wear it again!!! (^-^)


Friday, July 23, 2010

DIY the Look: American Apparel Edition pt 1 ((RESULTS))


I used a really old Black turtle neck:


I'm currently making another one as I post this........
Tutorial  HERE

Wednesday, July 21, 2010

DIY Fringe scarf (Super Easy!!!)


All you need to make this is a T-shirt and some scissors:

Got 'em?

Great, Peep the instructions:


Tip: Pull each strip so that they can curl up.

Wear your new creation!


Tuesday, July 20, 2010

DIY the Look: American Apparel Edition pt 1.


American Apparel Acid Wash Scarf
So I saw this scarf while scroll shopping on the American Apparel page.....
Oh American Apparel!
What's a sista to say about you?
That your $40 dresses cost me $3 or less to make?
That I can make most of the stuff in you in less than 1 hour? Alas, the musings are endless!
But seriously, American Apparel was the original inspiration behind the whole DIY the look series. Before I started blogging, my home gurl Roro and I would troll the shop nearby our school and I would marvel at how much stuff I could totally make at home. Then I started noticing the same thing in other stores. Then I found tons of fabric........

The rest is history.

Anyway, on to the DIY:

Heres what you'll need:
1 T-shirt
Bleach in a bowl
Scrub brush
Rubber gloves
Scissors

1. Wet your t-shirt and ring out some water.
2. Dip the brush into the bleach and let any excess drain off
3. In a slashing motion, lightly "scrub" random areas of your shirt, until you have "scrubbed" every section of the shirt.
4. Let it soak, and check for color change until you are satisfied.
5. Wash and dry.
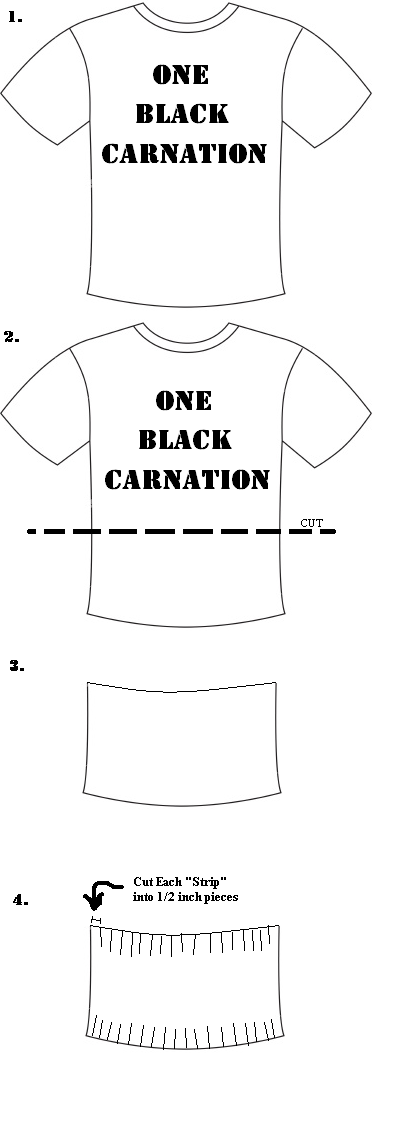
6. Cut the bottom of the shirt using the following instructions:


DONE!!!
Hey, keep the top piece as a cropped top! Layer it with some t-shirts, or wear it just so!

Btw, you will be seeing quite a few more of these American Apparel DIYs, at least until I find somewhere else to pick on.......

Peace!

Tuesday, June 08, 2010

Five minute Dress!!


Got an old tee lying around? Turn it into a dress in five minutes! (Click Here)

Monday, March 01, 2010

DIY Hair Clips!!


So I made two rosette hair clips for my hair out of old t-shirts, peep the results:


Ain't they purrty? Tutorials Coming Soon!

Wednesday, February 03, 2010

No Sew Fringe T-shirt dress (And Variations) RESULTS!

And since I lack the blessing of height, I had to take the chair:


I may decide to trick it out, or leave it be...We'll see!
Tutorial here


Sunday, January 31, 2010

No Sew Fringe T-shirt dress (And Variations)!


So here are my plans for my most recent project, a no sew t-shirt dress:
(Instructions follow the blueprint)
Not into fringes? No Problem click here for an alternative.


For this design, I'd reccomend a t-shirt that hits you either midthigh or somwhere by the knees, unless you plan to wear it with jeans or tights.

Instructions:

1. Cutting approximately 1 cm away from the seam, remove the neckline and sleeves from the shirt (Keep 'em around, never know what you can do with 'em!)
2. Cut open both sides of the t-shirt.
3. If you are a stickler for accuracy, put the t-shirt on and pin the sides and adjust until the fit satisfys you.
4. Cut "V" shaped notches along the sides of the shirt.
5. Tie the strips together and "Viola!" A fringe dress.

For cap sleeves:

Don't cut off the sleeves entirely, in step one, fold the shirt in half, cut half of the sleeve off. When cutting the notches for the fringe, cut the notches into the sleeve as well.

Btw, This pattern is also nice for any t-shirt, I just like making dresses =3
Update on the project results soon


Sunday, August 16, 2009

Distressed Jeans!!!


So here are the jeans I distressed by hand check it out:


Super Cool Flower print dress!

I cut up my mother's tall, flower print t-shirt, and made a dress (Sorry Mom!!) Check it out:

Pretty sweet eh?


Wednesday, August 12, 2009

Project #2: Distressed Jeans

Here's a detailed tutorial from Jeans and Accessories [.com] (Click here)

This page includes how to dye jeans, and also, how to bleach, and stain jeans! Chop chop!!

Want to know how to decorate your newly distressed jeans? Stay tuned!


Monday, August 10, 2009

Tutorial #2: T-shirt Dress


So I was looking for inspiration for a dress made out of a t-shirt and I happened across this tutorial. I will be trying this very soon!

A couple of tips:
a) Try using a wife beater or a plain tank instead of a t-shirt.
b) Decorate with studs, or stencils!
c) Use bright colors


Friday, August 07, 2009

Fun idea #2: DIY Studs

Here's another fun idea! Use metal thumbtacks to make studs! Just mark where you want the "studs" to be, insert the thumbtack (Flat side on the right side and the pin on the wrong side). Use a hammer to flatten the pin (And to keep it from sticking you!). For a more interesting look, use colored thumbtacks, or cover them in fabric. (Click here).
How about using those fabric covered thumbtacks as earrings? Have fun with it!

Click here to buy more conventional studs to trick out your diy fashion projects.


Thursday, August 06, 2009

Tutorial #1: Deep V Criss-cross tee

Remember that Criss-cross tee I did yesterday? Here's the tutorial!

Ingredients:

Boy-cut tee that fits a little loosely

Chalk


Fun Idea #1

Here's a fun idea! I was just looking through cre.ations.net and I saw stencil bleached shirts! You basically lay the shirt out put a stencil or a couple of household items where you want the effect and spray bleach in the area. Check out the results:
Stencil Bleach Shirts
More on stencils later.


Wednesday, August 05, 2009

Project #1: Deep V Criss-cross Tee

My second self planned Tee re-con. Check it out:

(The Front)

(The Back)

Tutorial tomorrow!!


LinkWithin

Related Posts with Thumbnails