Showing posts with label DIY. Show all posts

Wednesday, May 25, 2011

DIY (SIN)spiration #1


There are just too many things that are so DIY-able, its sinful. Why use the rent money on a new pair of shoes, when it can be made in a day for $3? Yeah, I thought so....
Here is this week's (SIN)spiration:
 Christian Louboutin Glitter Pumps: 



Now, That bad boy retails at a financially crippling (if you're a college kid like me) $795.
Here's the alternative (Which will cost you less than $40):
.
First you need some pumps shaped similarly to the ones above. Something like these:


You'll also need:
Loose glitter
Outdoor Mod Podge (for water resistance)
Paint brushes
A disposable container

1. Mix the Glitter with the Modge Podge in the disposable container (This ensures that the glitter stays put when you put it on the shoe. Be sure to mix in a lot of Glitter!!)
2. Use the paintbrush to paint the glitter mixture onto the shoes.
3. Let dry
4. Inspect the shoes. Fill in any missed spots and let dry again.
5. Paint a final thin layer of Modge Podge on the shoes, let dry and WEAR THEM!!

This techinque was developed by Annie Spandex, check her out!!

Sunday, May 15, 2011

DIY The Look: Lesson 10


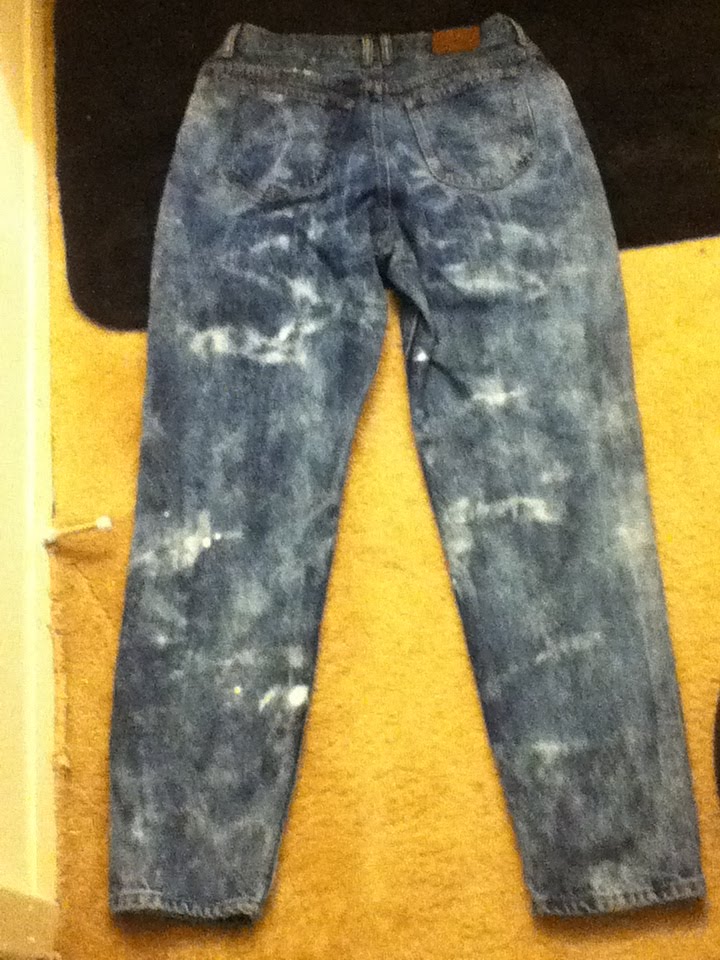
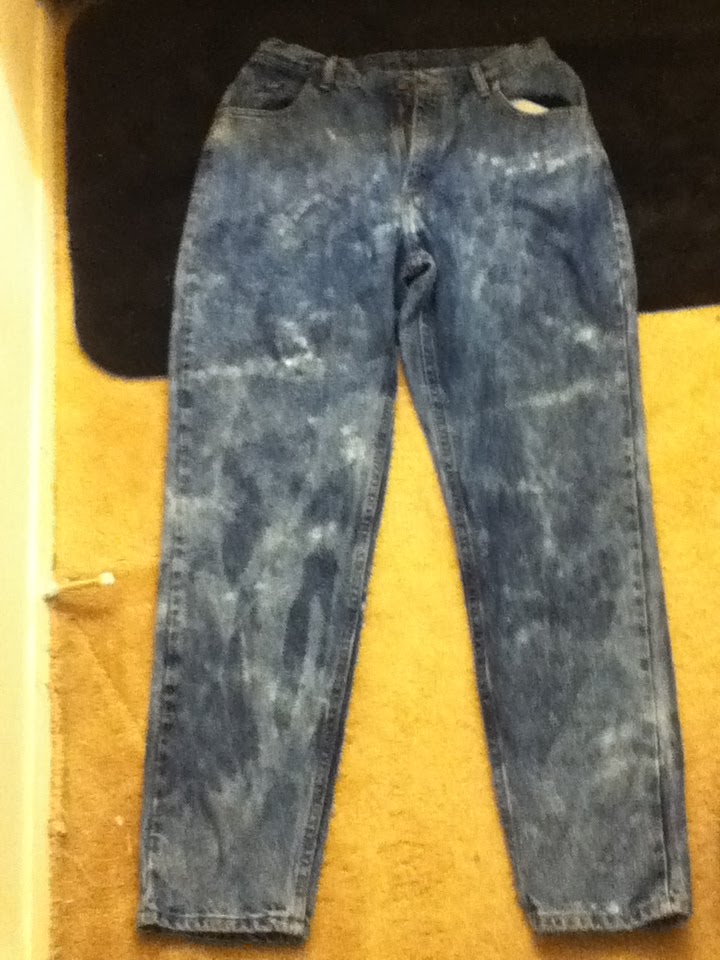
Hey folks!!! After, Like, a year I'm back!! Here's my latest projects as published.


Here's how to do it:
Materials:
Bleach
Bowl
Paint Brush (The bigger the better)
Scrubbing Brush

Uh, your JEANS?

First you need to dampen your jeans. Pour some bleach into a bowl to get started....
Lay your jeans out on a surface that won't be affected by bleach. Take your scrubbing brush and "scrub" both sides of both of the legs of your jeans. Let it sit until the jeans are 2-3 shade lighter than before. Rinse them and survey the damage your work.
Like it? Good! You are ready to bleach!!
Here are the two techniques I used:
Splatter:


This one is simple: Just dip the paintbrush in bleach and "throw" the bleach onto the jeans (using the paintbrush) as you would if you were splatter painting. Let it sit until you see white. 

Tie dye:
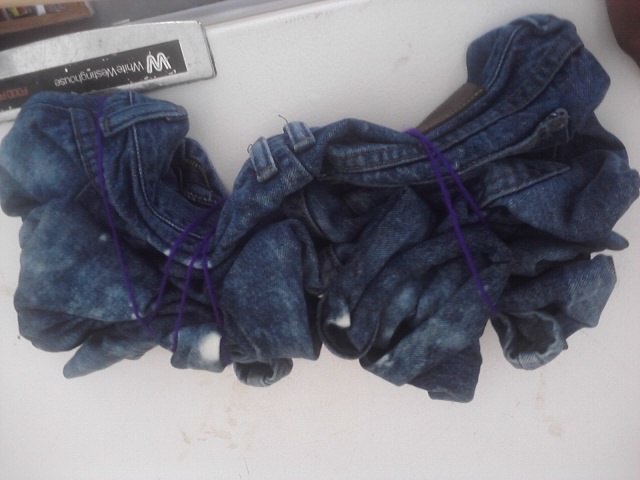
To do the tie dye technique I scrunched the legs of my jeans up like this:

 
Then using my paintbrush, I painted the exposed fabric with bleach. After this, I let it sit for ten minutes, turned the jeans over and let sit for another ten minutes. When I was satisfied with the color, I rinsed the bleach out.

Wash your jeans and wear them =)


Monday, March 28, 2011

Tired of My Jeans Wearing Out!! (How to keep those jeans living long!)

I AM SOOO TIRED OF MY JEANS WEARING OUT!!!


I can only blame myself for buying cheap jeans that probably wouldn't last to long in the first place, but can't a sista' get a little longevity? I've decided to go ahead and thrift the next set I'm buying so that I can buy the better quality brands. But in the mean time, I was looking for ways to increase the life span of my jeans and I found this suggestion in a forum:

"May I suggest that you try to get as much life as possible life out of your cloth by altering your washing procedure?
Here's my rules for washing denim:
1) Wash only when you absolutely have to. I wash my jeans maybe once a month in the summer and stretch it out longer in the winter, maybe once every four months. This may sound gross, but I let my pants hang up between washings so they can air out, it keeps them reasonable for public occasions. A cold water soak (no detergent or agitation) can do wonders also.
2) When I must wash, I wash them inside-out cold water in Woolite Dark Colors detergent on gentle. Some argue that you shouldn't put them on spin, I'm not quite that hard core.
3) Never, ever put them in the dryer. Let them air dry.
I can keep a pair of Levi's going for 2 years using this procedure, and my APC's still look brand new."

Some other suggestions included smearing all-purpose glue on the area that is most susceptible to wear, or sewing on iron-on patches (then ironing the area). I'm Trying all of these!! going to get around to trying some of these techniques.
How do you keep your jeans alive?
 

Wednesday, September 01, 2010

I'm baaaaaack!!(Well, kinda....)


These days my postings will be irregular because, I'm back at school and have been quite busy with schoolwork and friends. But I will be postings pics of anything I've done recently...
......And with that said, check out my current Pride and joy:

Can't wait to wear it again!!! (^-^)


Tuesday, July 27, 2010

Friday, July 23, 2010

DIY the Look: American Apparel Edition pt 1 ((RESULTS))


I used a really old Black turtle neck:


I'm currently making another one as I post this........
Tutorial  HERE

Thursday, July 22, 2010

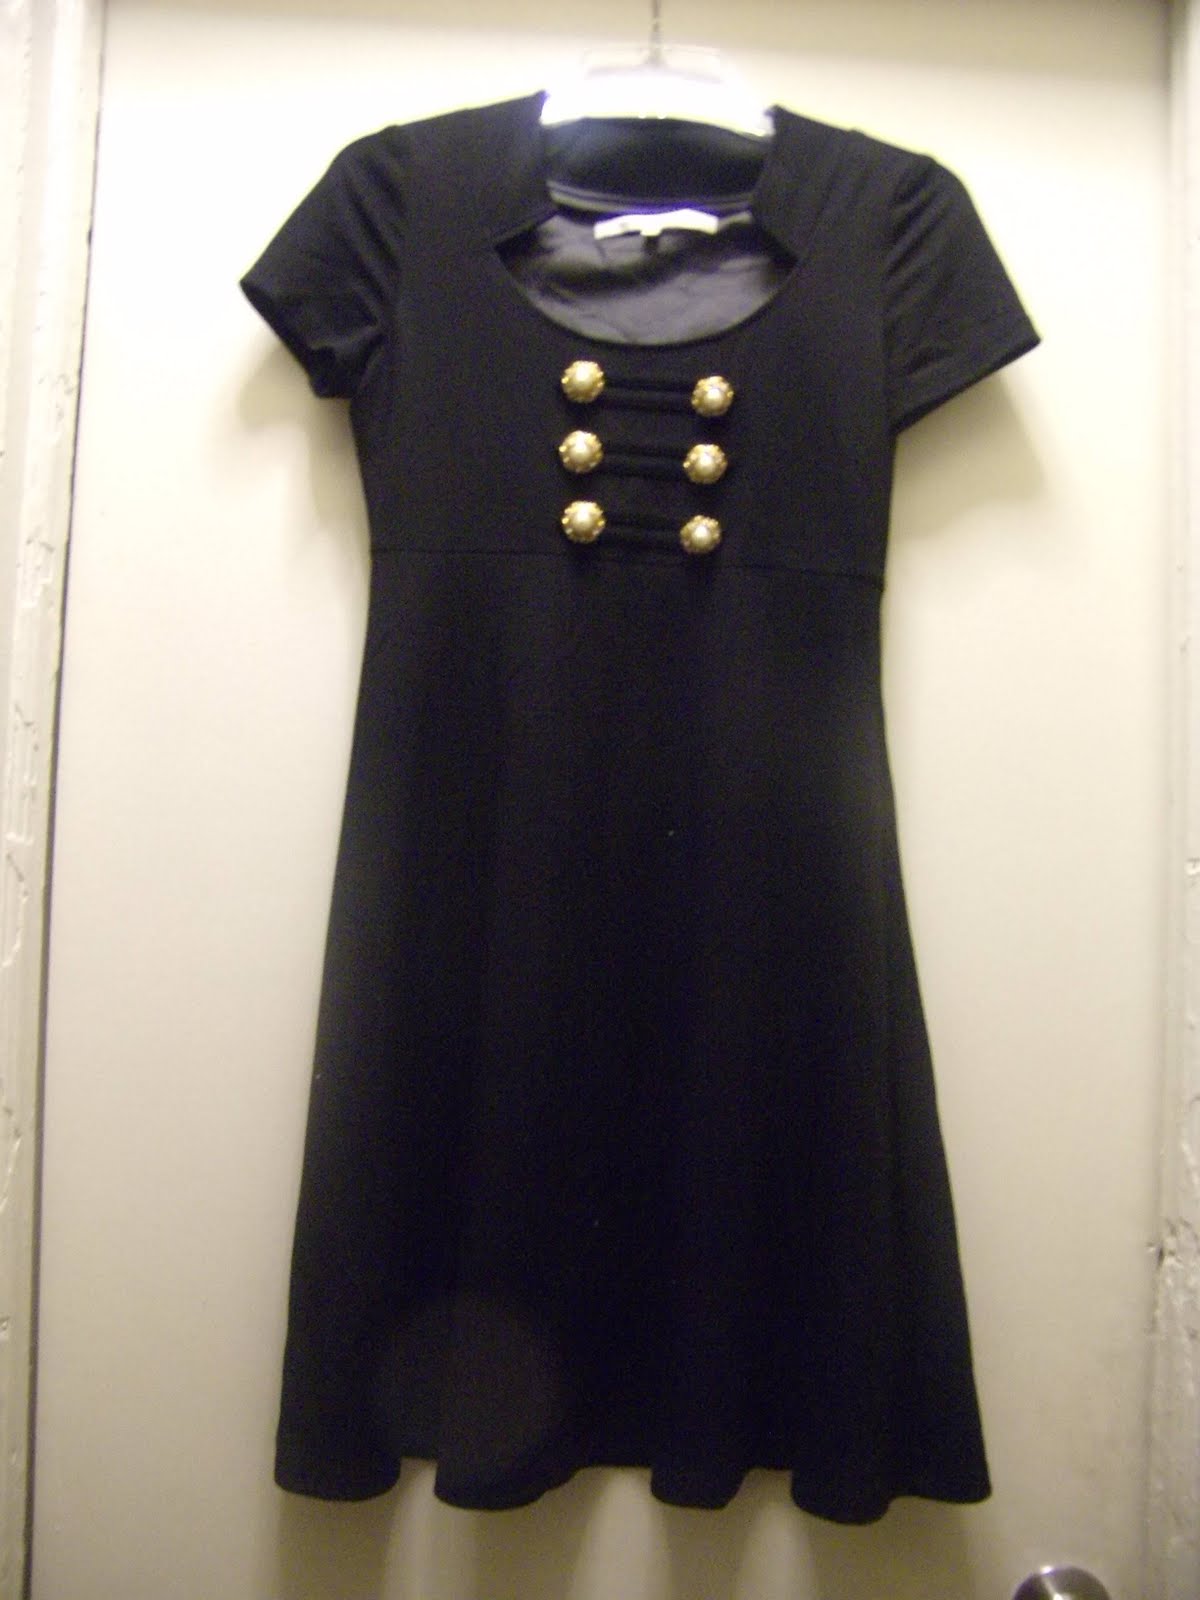
Diane Von Furstenberg refashion!!!


So I found this Dianne Von Furstenberg dress while thrifting in NYC (The Goodwill Outlet ^-^):


It was originally missing one button (Dunno where the other one went...), so I got some new ones and put them on:


Mini Make-over successful!!

Wednesday, July 21, 2010

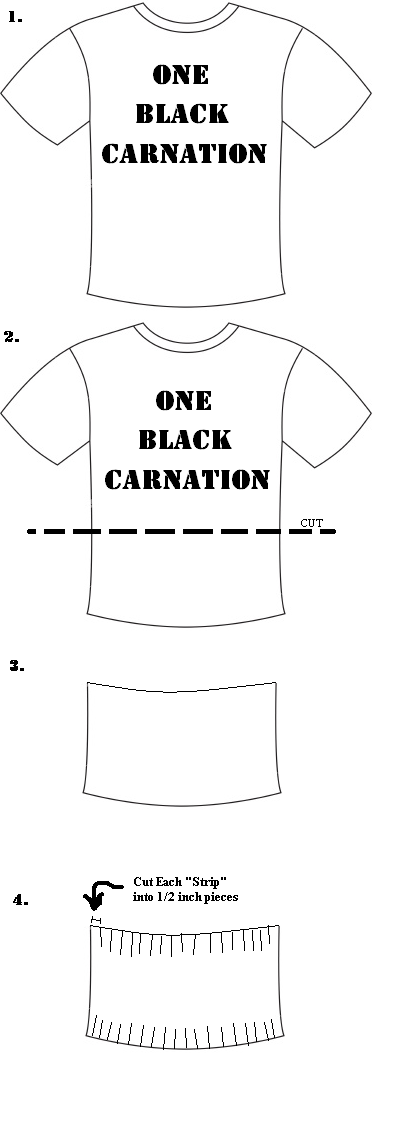
DIY Fringe scarf (Super Easy!!!)


All you need to make this is a T-shirt and some scissors:

Got 'em?

Great, Peep the instructions:


Tip: Pull each strip so that they can curl up.

Wear your new creation!


Tuesday, July 20, 2010

DIY the Look: American Apparel Edition pt 1.


American Apparel Acid Wash Scarf
So I saw this scarf while scroll shopping on the American Apparel page.....
Oh American Apparel!
What's a sista to say about you?
That your $40 dresses cost me $3 or less to make?
That I can make most of the stuff in you in less than 1 hour? Alas, the musings are endless!
But seriously, American Apparel was the original inspiration behind the whole DIY the look series. Before I started blogging, my home gurl Roro and I would troll the shop nearby our school and I would marvel at how much stuff I could totally make at home. Then I started noticing the same thing in other stores. Then I found tons of fabric........

The rest is history.

Anyway, on to the DIY:

Heres what you'll need:
1 T-shirt
Bleach in a bowl
Scrub brush
Rubber gloves
Scissors

1. Wet your t-shirt and ring out some water.
2. Dip the brush into the bleach and let any excess drain off
3. In a slashing motion, lightly "scrub" random areas of your shirt, until you have "scrubbed" every section of the shirt.
4. Let it soak, and check for color change until you are satisfied.
5. Wash and dry.
6. Cut the bottom of the shirt using the following instructions:


DONE!!!
Hey, keep the top piece as a cropped top! Layer it with some t-shirts, or wear it just so!

Btw, you will be seeing quite a few more of these American Apparel DIYs, at least until I find somewhere else to pick on.......

Peace!

Wednesday, June 09, 2010

The Vintage Plan


The Plan is this: this summer, I am going to start shopping vintage. Thrift stores, Vintage shops, eBay, Etsy, iOffer, you name it, I'm there.
Here are a couple of reasons why you should shop vintage too(Scroll down if you want more recent options):


1. Recycle!- The average family gets rid of twenty bags of clothing every year! Why not send it on over to the thrift shop, get some new duds and DIY to your heart's content? If you feel weird about wearing used clothing, steam clean it!(The cheapest way is to throw a wet towel and the items into a dryer and allow the steam to get to work)

2. Save Money!- Its true that many vintage items are quite expensive, but there are many places online (eBay!!! Etsy!) and offline (Thrift shops, Consignment shops, Flea markets, Swap meets, etc.) that sell cheap items. Also many shops allow you to trade your clothes for "new" clothes. Where else will you get a pair of perfectly worn cowboy boots? H&M? NOT!

3. Uniqueness!- You read that right, the chance of bumping into someone else wearing that cute 1970's sundress are next to nothing. Also many vintage items were handmade, so it'd be impossible to find someone else wearing the exact same dress!

4. DIY!- Nothing says "DIY me" like a Evening gown that can become a fabulous day dress with a couple of snips and tucks. Hey, you can even sell your refashioned creations!

Okay for the ladies who aren't really into the vintage thing, there is a store you MUST check out, its called Platos closet and they sell only recent brand name products for severely discounted prices. They also do these big events where you pay one flat price for as many items you can fit into oneshopping bag (Down here it's $20). While the store is aimed at the teen to young adult category, many adults find things they like in the shop as well. Did I mention that it's a thrift shop? See if there are any stores near you:

Plato's Closet

Peace!!

Tuesday, June 08, 2010

Five minute Dress!!


Got an old tee lying around? Turn it into a dress in five minutes! (Click Here)

Wednesday, June 02, 2010

Diy Hair Accessories


Ladies, get your glue gun ready, Elle magazine has 4 runway-inspired hair accesories DIYs. I loved them so much, I just had to post it! Click here for details!

Btw, the laptop is back....still messed up, but back......


Monday, May 17, 2010

DIY the look: 30 minute necklace


Sorry for the absense! My laptop is SHOT, and until I get a new one, things might be a lil shaky, so I'll just go ahead and apologize ahead of time =). On to the post:


You can make that in 30 minutes!!! Click Here for a tutorial!
Now I know the tutorial calls for some sewing machine, but if you want, you can make the "chain" longer, knot the ends and a bow at the back to wear it a different way!


Monday, May 03, 2010

DIY the look: Lesson 9


So I was trollin' Cut Out and keep and found this dress:


Its called the "infinity dress" apparently it originated in the 70's and can be worn as many ways as the owner can think of, including as a skirt. Well the dress also happens to be really easy to make. As simple as cutting four shapes and sewing one seam. Just follow this tutorial: over at Rostitchery (Click here)


Tuesday, April 27, 2010

T-Shirt Necklace: My version


My pride and joy!!
I braided the back piece and sew it to the front piece

Wrapping detail

Note: This Necklace is a variation of this necklace.

Update: Tutorial in the works!!!

Monday, April 26, 2010

DIY the look: Lesson 8


This week on DIY the look, We are going to explore ways to make the above necklace. Here is the tutorial for the the base necklace (There is a link at the top tutorial, ignore it, the tutorial follows).

You can trick out your new necklace the following ways:
1. Stud it (Will look something like the necklace above.)
2. Add necklace Charms
3. Combine multiple colors (Just cut each strip shorter, wrap and then combine) 
4. Add beads.
5. add chains or pearls to the necklace
6. Add a bow or flower

Best of all, this can be made in under two hours!!
If fact I made a variation for myself! (Pics will be posted sometime this week)
I'd love to see some pictures or your versions of this rad necklace!


LinkWithin

Related Posts with Thumbnails